API Doc
这里选择用 redoc 来展示API Doc, 因为相比于经典的Swagger UI要好看些:
默认配置
- toml
- env
# Swagger API文档路径配置
[apidoc]
  # Swagger API Doc URL路径, 默认自动生成带前缀的地址比如: /api/{service_name}/v1/apidoc
  # 你也可以在这里 修改这个相对路径
  base_path = ""
  # swagger json api path: {base_path}{json_path}, 比如/api/{service_name}/v1/apidoc/swagger.json
  json_path = "/swagger.json"
  # ui path: {base_path}{ui_path}, 比如/api/{service_name}/v1/apidoc/ui.html
  ui_path = "/ui.html"
APIDOC_BASE_PATH=""
APIDOC_JSON_PATH="/swagger.json"
APIDOC_UI_PATH="/ui.html"
基本使用
Gin框架
gin 框架是通过注释+代码生成的方式来实现的api文档自动生成
依赖的工具:
- Swag: 将Go的注释转换为Swagger2.0文档
添加文档
- 在main.go源代码中添加通用的API注释
// @title           Swagger Example API
// @version         1.0
// @description     This is a sample server celler server.
// @termsOfService  http://swagger.io/terms/

// @contact.name   API Support
// @contact.url    http://www.swagger.io/support
// @contact.email  [email protected]

// @license.name  Apache 2.0
// @license.url   http://www.apache.org/licenses/LICENSE-2.0.html

// @host      localhost:8080
// @BasePath  /api/v1

// @securityDefinitions.basic  BasicAuth

// @externalDocs.description  OpenAPI
// @externalDocs.url          https://swagger.io/resources/open-api/
func main() {
	// 注册HTTP接口类
	ioc.Api().Registry(&HelloServiceApiHandler{})

	// 启动应用
	err := server.Run(context.Background())
	if err != nil {
		panic(err)
	}
}
- 在controller代码中添加API操作注释
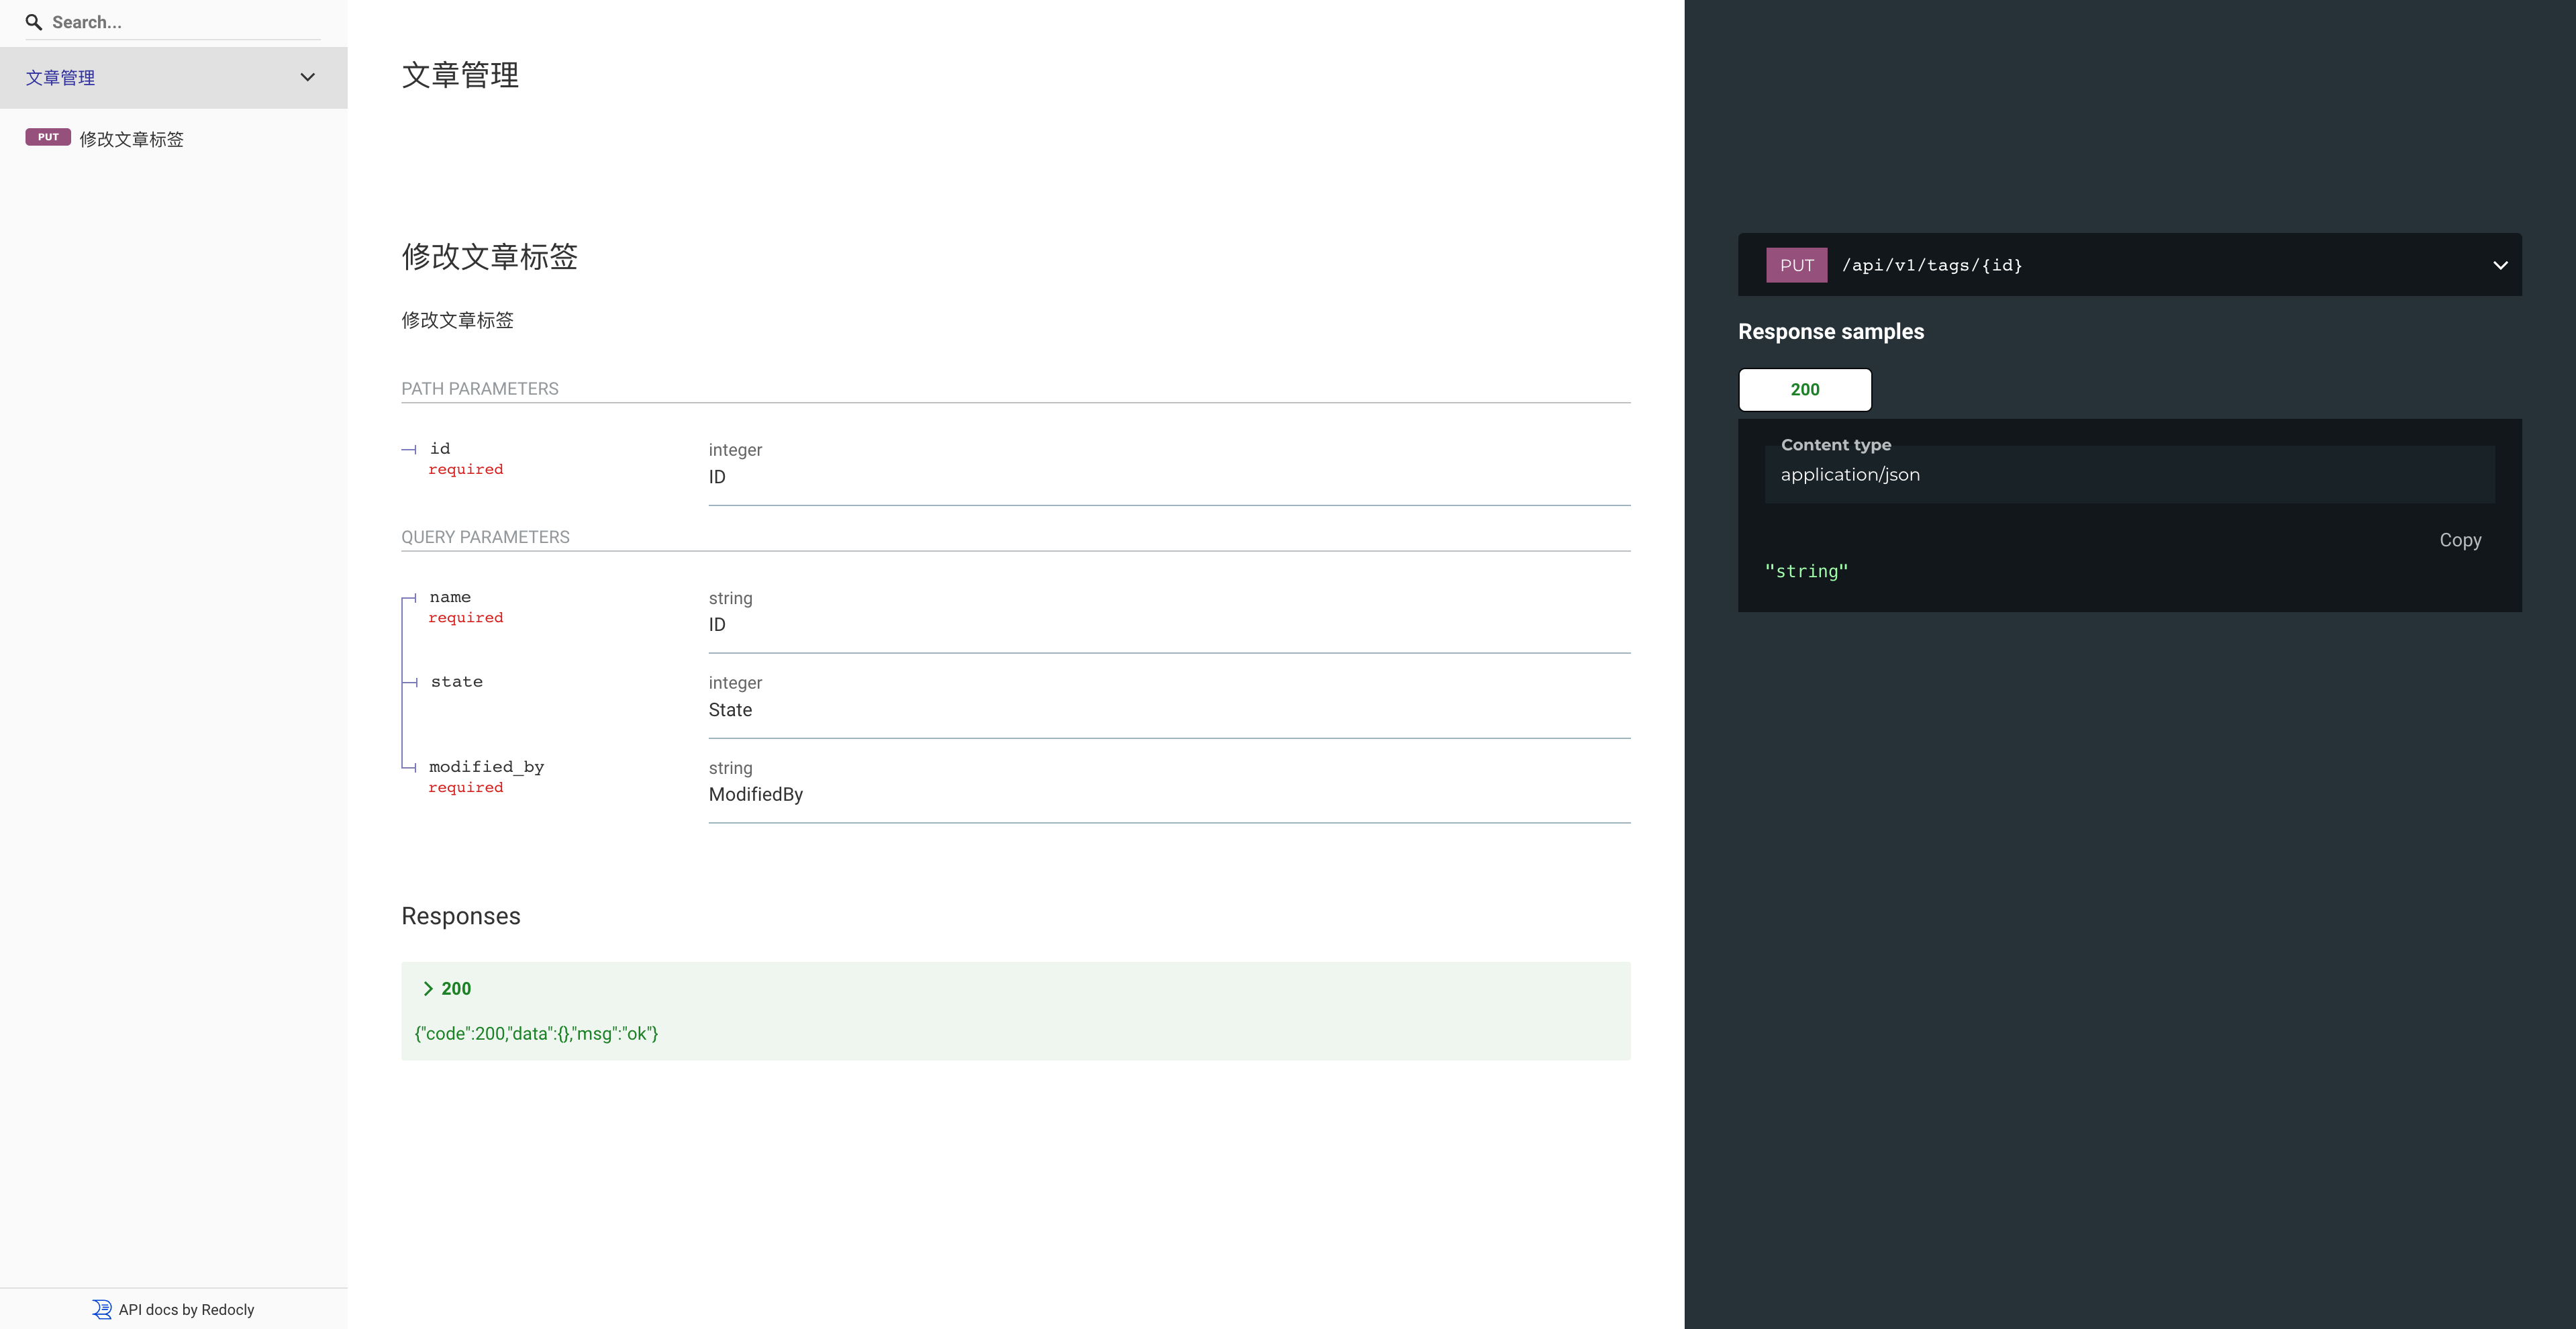
// @Summary 修改文章标签
// @Description  修改文章标签
// @Tags         文章管理
// @Produce  json
// @Param id path int true "ID"
// @Param name query string true "ID"
// @Param state query int false "State"
// @Param modified_by query string true "ModifiedBy"
// @Success 200 {string} json "{"code":200,"data":{},"msg":"ok"}"
// @Router /api/v1/tags/{id} [put]
func (h *HelloServiceApiHandler) Hello(c *gin.Context) {
	c.JSON(http.StatusOK, gin.H{
		"data": "hello mcube",
	})
}
生成代码
- 安装代码生成工具:
go install github.com/swaggo/swag/cmd/swag@latest
- 在包含main.go文件的项目根目录运行swag init。这将会解析注释并生成需要的文件(docs文件夹和docs/docs.go)
swag init
- 最后在main.go所在目录 就看到生成好的代码了
$ tree .
.
|____docs
| |____swagger.yaml
| |____docs.go
| |____swagger.json
|____main.go
引入工具
import (
...
// 引入生成好的API Doc代码
_ "github.com/infraboard/mcube/v2/examples/http_gin/docs"
// ��引入集成工程
_ "github.com/infraboard/mcube/v2/ioc/apps/apidoc/swaggo"
...
)
然后启动服务
studio :: mcube/examples/http_gin ‹master*› » go run main.go
...
2024-10-07T22:16:34+08:00 INFO   apidoc/swaggo/swagger.go:56 > Get the API JSON data using http://127.0.0.1:8080/api/v1/apidoc/swagger.json component:API_DOC
2024-10-07T22:16:34+08:00 INFO   apidoc/swaggo/swagger.go:59 > Get the API UI using http://127.0.0.1:8080/api/v1/apidoc/ui.html component:API_DOC
2024-10-07T22:16:34+08:00 INFO   config/http/http.go:144 > HTTP服务启动成功, 监听地址: 127.0.0.1:8080 component:HTTP
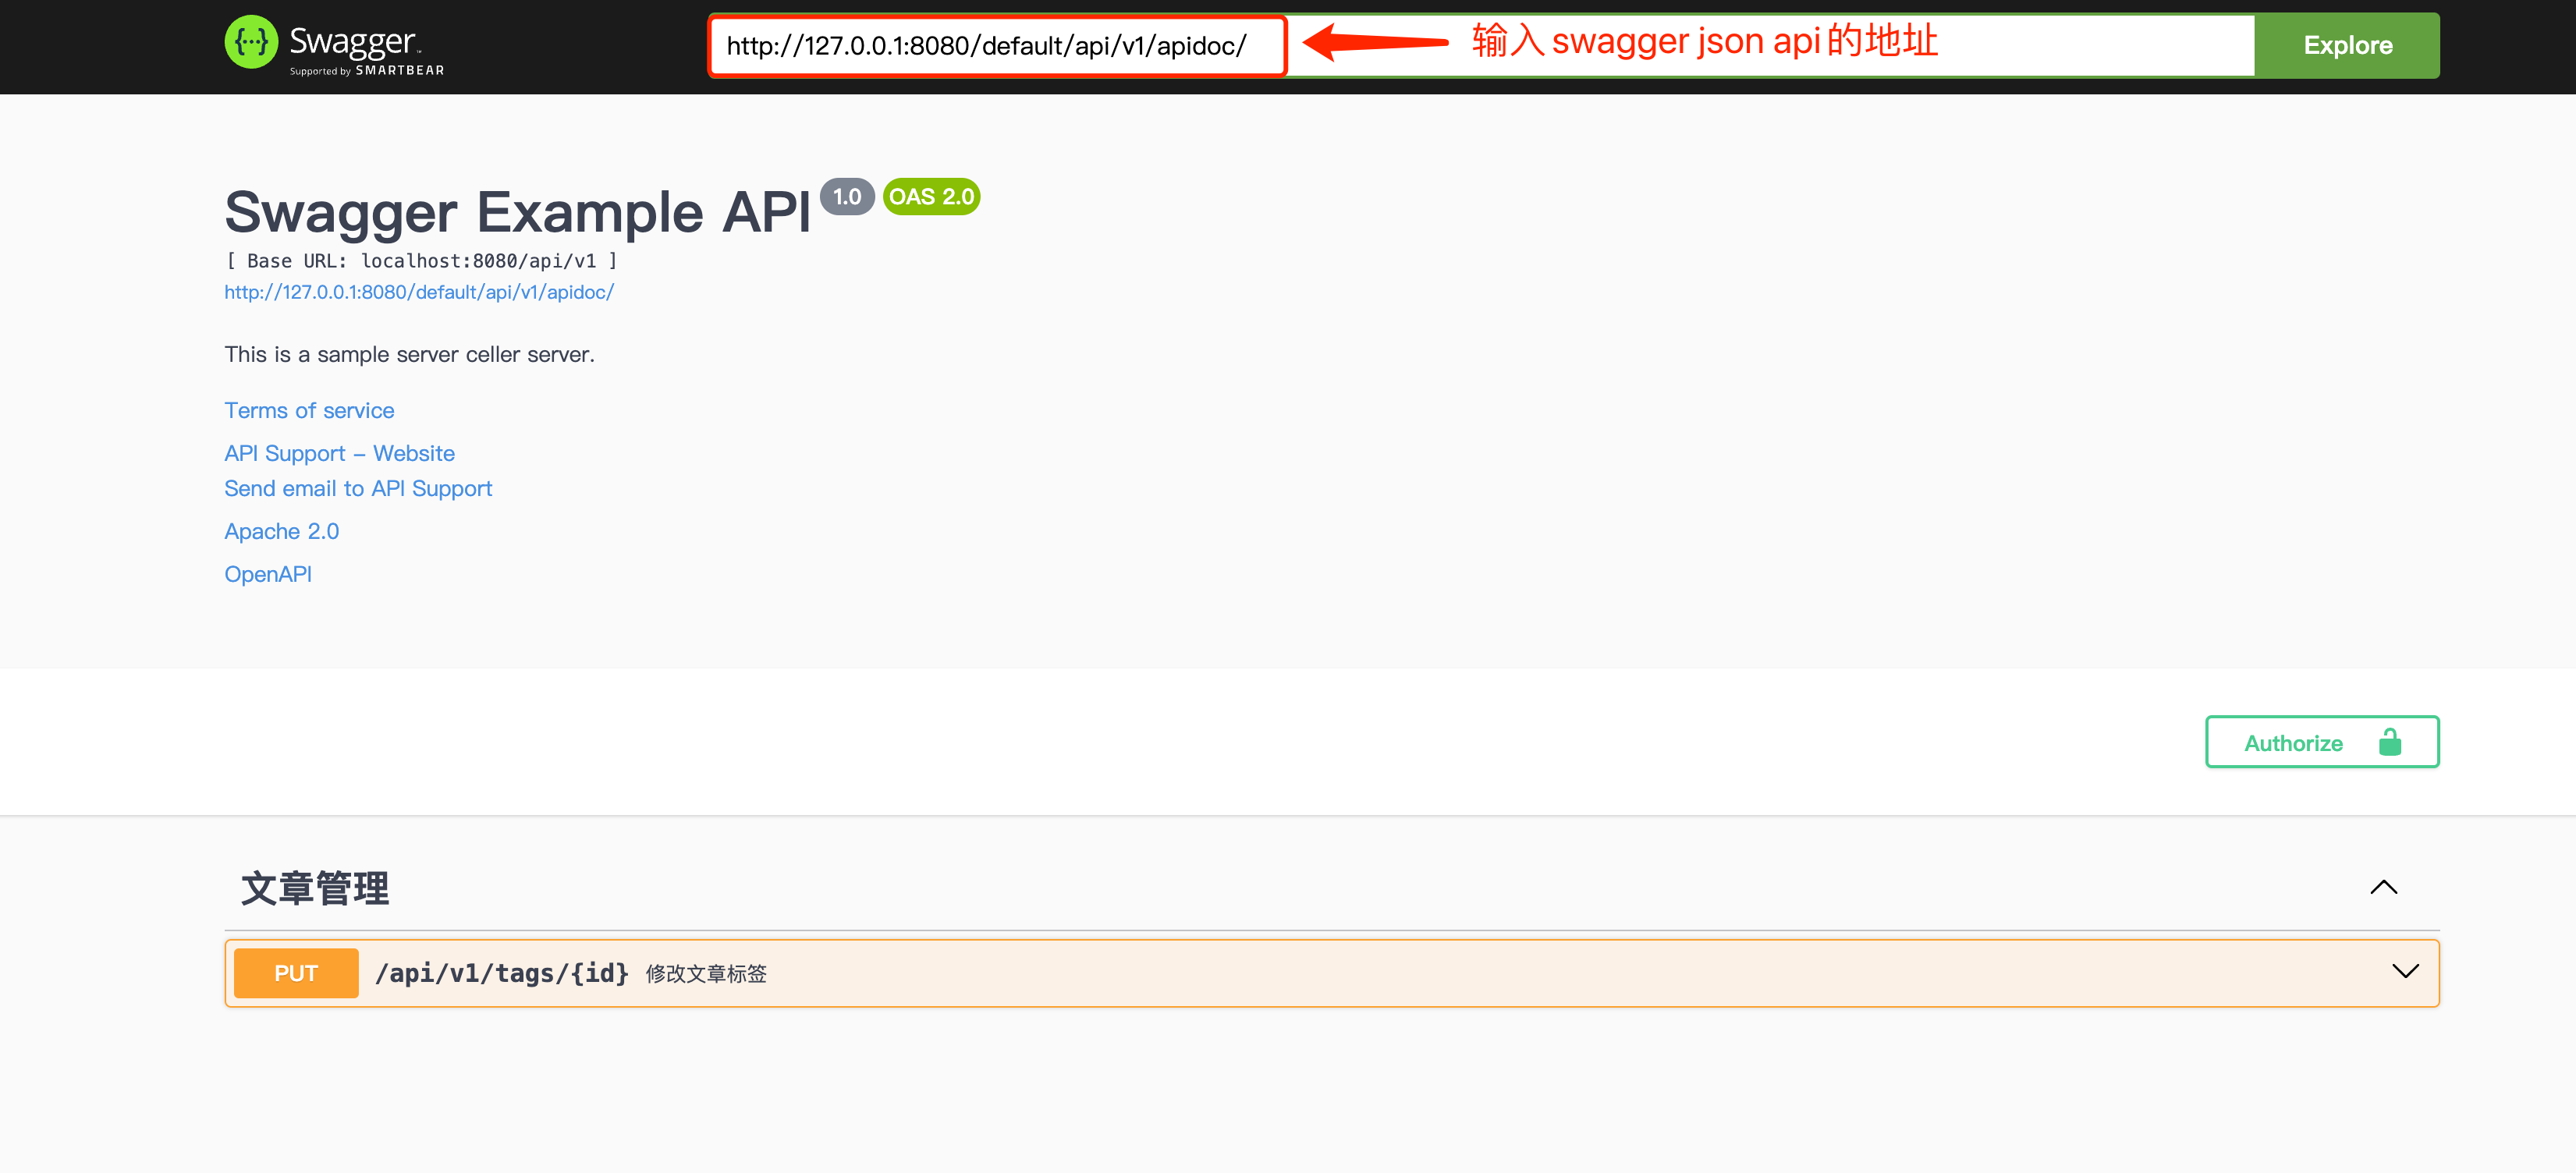
然后通过 http://127.0.0.1:8080/api/v1/apidoc/swagger.json 就可以访问到 swagger 生成的json api数据, 也可以直接通过 http://127.0.0.1:8080/api/v1/apidoc/ui.html访问 API Doc UI
GoRestful框架
go-restful框架 是通过路由装饰来实现api文档的自动生成, 因此集成起来比较容易
��添加文档
ws.Route(ws.GET("/{id}").To(h.DescribeBuildConfig).
  Doc("构建配置详情").
  Param(ws.PathParameter("id", "identifier of the secret").DataType("string")).
  Metadata(restfulspec.KeyOpenAPITags, tags).
  Writes(build.BuildConfig{}).
  Returns(200, "OK", build.BuildConfig{}).
  Returns(404, "Not Found", nil))
引入工具
import (
  // 开启API Doc
	_ "github.com/infraboard/mcube/v2/ioc/apps/apidoc/restful"
)
2024-10-07T22:19:03+08:00 INFO   apidoc/restful/swagger.go:68 > Get the API JSON data using http://127.0.0.1:8080/api/v1/apidoc/swagger.json component:API_DOC
2024-10-07T22:19:03+08:00 INFO   apidoc/restful/swagger.go:74 > Get the API UI using http://127.0.0.1:8080/api/v1/apidoc/ui.html component:API_DOC
API Doc Swagger UI展示
如果你不想使用集成好的API Doc UI, 也可以自己使用Swagger UI
要展示 Swagger 的 API Doc需要:
- Swagger Doc API: 提供数据
- Swagger UI: 提供数据展示
Swagger Doc API
http://127.0.0.1:8080/apidocs.json
{
	"swagger": "2.0",
	"paths": {
		"/metrics/v1/hello_module": {
			"get": {
				"consumes": [
					"application/json",
					"application/x-www-form-urlencoded",
					"multipart/form-data",
					"application/yaml",
					"application/yaml-k8s"
				],
				"produces": [
					"application/json",
					"application/yaml",
					"application/yaml-k8s"
				],
				"operationId": "func1",
				"responses": {
					"200": {
						"description": "OK"
					}
				}
			}
		}
	}
}
Swagger UI
离线方式
docker run -p 80:8080 swaggerapi/swagger-ui
通过localhost:80 方便离线版本的swagger-ui
在线展示
我们利用Swagger官网工具: Swagger UI Live Demo
由于我们使用的在线工具, 会存在跨越问题(CORS), 因此需要引入跨越, 默认是全开放, 具体配置参数见CORS模块
import (
	// 开启CORS, 允许资源跨域共享
	_ "github.com/infraboard/mcube/v2/ioc/config/cors"
)